
Implementing Launch at Login Feature in MacOS Apps
by Jogendra
In this post, I will explain, how you can add the Launch at Login (launch application on system startup) feature to your MacOS Applications. Adding this feature is way more complex than you would expect. I use MeetingBar for managing my work/personal meetings over Google Meet and Zoom. MeetingBar is an open-source MacOS App. Recently, I added the Launch at Login feature to MeetingBar. Initially, I thought that there will be a simple solution to it and it will take minutes only. But when I started implementing it, I found out that it is not really that straight forward. You can find the implementation source code below.
Link to Pull Request: Add Launch at Login feature
Source Code for this post: https://github.com/jogendra/launch-at-login-macos
For the users, a straightforward solution is going to system preference and enable auto launching for applications (Preferences -> Users & Groups -> Login Items). But it is always good if the application itself offers the feature from its preference. For application developers, it’s a bit tricky.
There are a couple of ways to add a login item to the application. The most used/useful way is using the Service Management framework. Login items installed using the Service Management framework are not visible in System Preferences and can only be removed by the application that installed them. The other way is using a shared file list. Login items installed using a shared file list are visible in System Preferences; users have direct control over them. If you use this API, your login item can be disabled by the user.
In this post, I will explain how to add login items to MacOS Applications using the Service Management framework. The idea is to create an application inside the main application that handles the auto launching for the main application.
Little bit about Apple App Sandboxing
According to Apple documentation, to distribute a macOS app through the Mac App Store, you must enable the App Sandbox capability. App Sandbox provides protection to system resources and user data by limiting your app’s access to resources requested through entitlements. Apps signed and distributed outside of the Mac App Store with Developer ID can (and in most cases should) use App Sandbox as well. App Sandbox enables you to describe how your app interacts with the system. The system then grants your app the access it needs to get its job done and no more. It is always best to design your apps with App Sandbox in mind. You can check out this detailed article by Appcoda on Mac App Sandbox.
Every application is given a sandbox, a directory it can use to store data. An application cannot access the sandbox of another application. If the application needs access to data on the device that isn’t located in the application’s sandbox, it needs to request the data through a system interface. System interfaces add a layer of security and protect the user’s privacy.

To adopt App Sandbox for a target in an Xcode project, apply the <true/> value to the com.apple.security.app-sandbox entitlement key for that target. Do this in the Xcode target editor by selecting the Enable App Sandboxing checkbox.

Generally, when you create macOS App, it is already added, you don’t have to worry about it.
 Initial Setups
In this post, we will use MainApplication for the main application (using SwiftUI) in which we are going to add Launch at Login functionality and the other one will be AutoLauncher, which is our helper application that is responsible for registering our main application for login items.

 Adding Helper Target
To add helper target AutoLauncher to our MainApplication, go to File -> New -> Target and choose macOS template with App selected (under Application section) and click Next button to choose options for helper application.

In next screen, choose ‘AutoLauncher’ for Product Name (or whatever name you want to give), select ‘Storyboard’ option for the User Interface option (we will delete this interface later anyway), make sure the Project option has ‘MainApplication’ target selected and finish the setup.
 Helper Target Configurations
- Since our helper target AutoLauncher should be background only as we don’t need user interface for AutoLauncher. So to make it background only service, go to
Info.plistof AutoLauncher, setApplication is background onlykey toYES.

- Go to Targets, select ‘AutoLauncher’ Target’s Build Settings, and search for “skip install”. Set
Skip InstalltoYes. Otherwise we would end up with too many bundles in our final app archive.

- Go to
AppDelegate.swiftof AutoLauncher, rename class nameAppDelegatetoAutoLauncherAppDelegate(or whatever name you want to give) because it is conflicting withAppDelegateclass of our MainApplication. We will configure this Delegate class methodapplicationDidFinishLaunching(_ :)like below. It check if MainApplication is running, if not, launch application usingopenApplication(at:_:_:). This instance method launches the app at the specified path URL.

This AutoLauncher app target is actually embedded inside the MainApplication bundle under the subdirectory Contents/Library/LoginItems (we are going to do this later). So including the helper app target name (AutoLauncher) there will be a total of 4 path components to be deleted. That’s why we are running loop 4 times.
 Cleaning Up Helper Target UI Elements
Helper target app (AutoLauncher) should not have any UI elements. We will remove all the visual elements from the app, even the Main.storyboard. Now, got ahead and:
- Delete
ViewController.swiftfile. - Delete
Assets.xcassetsfolder. - Delete
Main.storyboard.
Since we have deleted entry point of AutoLauncher target which was earlier configured in deleted Main.storyboard file. To make that up, follow:
- Create and add
main.swiftfile (please note it has to be ”main” with lowercased ”m”, otherwise it won’t work) to AutoLauncher. - Remove
@NSApplicationMainfromAutoLauncherAppDelegateclass.@NSApplicationMainis no longer needed because in-general@NSApplicationMainimplicit generate themain.swiftfile for us which we have already created. - Set the Application delegate like below in
main.swift:

Clean? We are done with all the setups for helper. Now, let’s configure our Main Application.
 Adding Helper to Main Application
We have to copy the helper application AutoLauncher inside our MainApplication. To do so, go to Project Setting, have MainApplication target selected, select Build Phases, click + icon shown below, and select New Copy Files Phase.

Apply Settings as below:
Select Wrapper as Destination, put Contents/Library/LoginItems in Subpath and finally click on + icon to add AutoLauncher.app there (it will be inside Product folder).

Now, go to General tab and Add ServiceManagement framework to Frameworks, Libraries, and Embedded Content section.
You can now import ServiceManagement to any of your swift file and use the SMLoginItemSetEnabled(_:_:) function to enable a helper application. It takes two arguments, a CFStringRef containing the bundle identifier of the helper application, and a Boolean specifying the desired state. This value is effective only for the currently logged-in user. Pass true to start the helper application immediately and indicate that it should be started every time the user logs in. Pass false to terminate the helper application and indicate that it should no longer be launched when the user logs in. This function returns true if the requested change has taken effect; otherwise, it returns false. This function can be used to manage any number of helper applications.
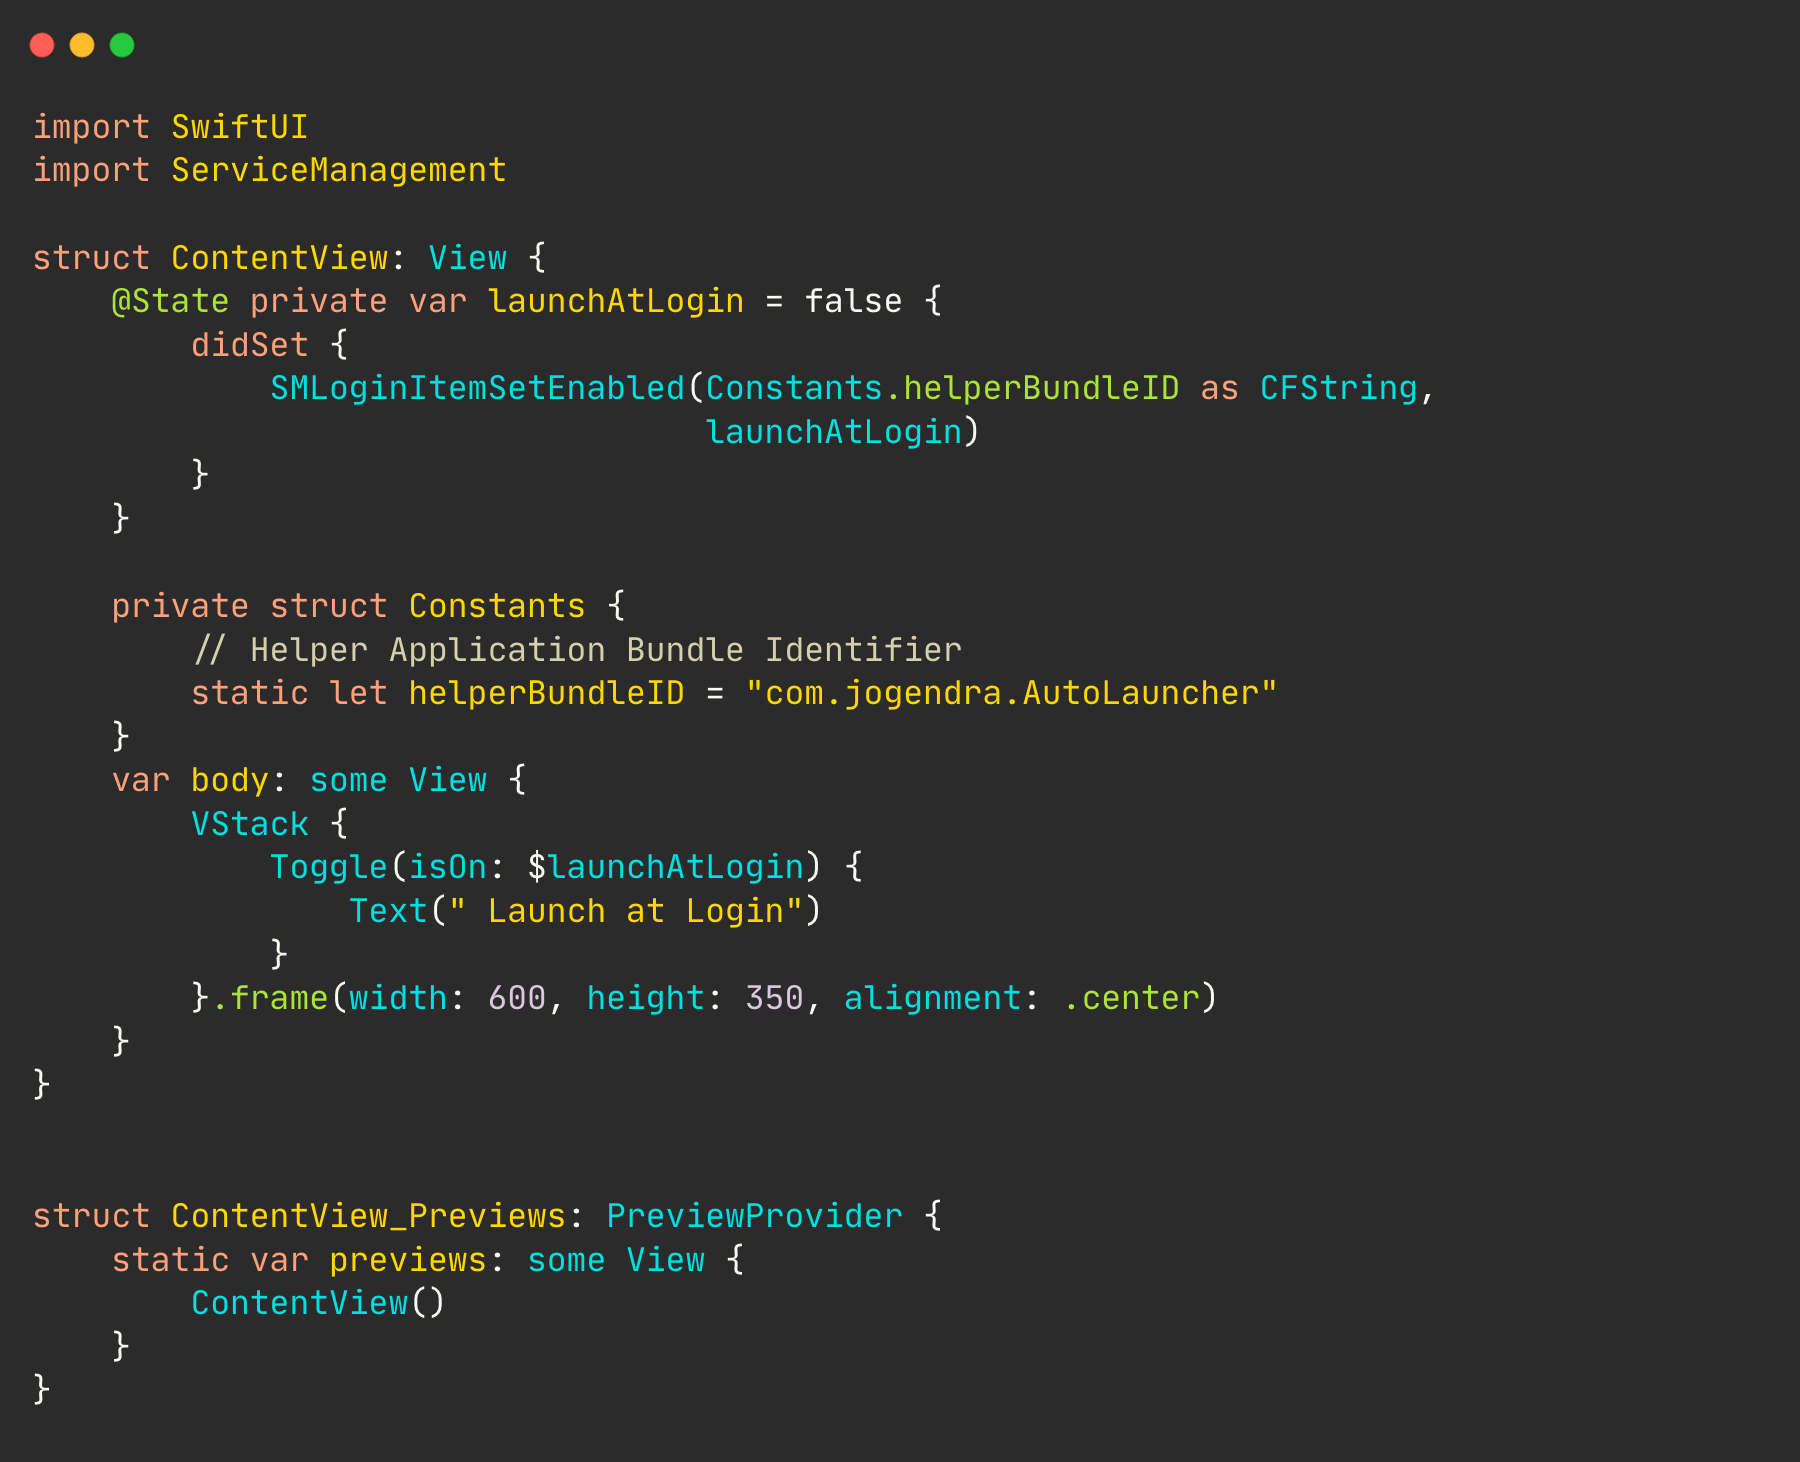
Example UI

In this example, I just added a simple toggle using SwiftUI. On toggle, it’s calling SMLoginItemSetEnabled function with helper app identifier and current state of toggle. Further, you can store current state in UserDefaults.
NOTE: If multiple applications (for example, several applications from the same organization) contain a helper application with the same bundle identifier, only the one with the greatest bundle version number is launched. Any of the applications that contain a copy of the helper application can enable and disable it. You should keep this in mind if you are shipping applications under the same organization. You can read more in detail about this here.
 Helpful Links
- App Sandbox in Depth
- Creating a macOS App in SwiftUI
- SMLoginItemSetEnabled Method Documentations
- Beyond App Sandbox: Going outside of the macOS app container
- Using App Groups for communication between macOS/iOS apps from the Same Vendor
 Closing Notes
We have seen how we can add login items to any MacOS application. You can Download Full Source Code Here. Adding login items to macOS applications isn’t that straight-forward. You need to follow all the setps carefully. I hope this post helped you in some way. Do share and drop me suggestions/questions on Twitter. Thanks for read :)
Subscribe via RSS